Integrate Oauth2 check into strongswan using vpn-webauth
what is vpn-webauth
This is quick (and dirty) web application allowing to add a second round of authentication to a Strongswan VPN using OAuth2. It doesn’t replace, and in fact requires, the normal Strongswan authentication process using passwords or certificates.
This project uses the strongswan ext-auth plugin to hook itself into the authentication flow and provide an additional layer of authentication using OAuth2 (Google/Gsuite or Microsoft Azure) and optional 2FA. This can help to protect your organization against VPN credentials or certificates being leaked or stolen.
It can also help achieve compliance with some security standards requiring MFA to be implemented for VPNs giving access to sensitive environments.
This tool compatible with all VPN clients and operating systems.
Step by Step guide to utilize this app
To integrate this application with strongswan to enable oauth2, we should first apply the google/azure oauth2 service.
Enable oauth2 service
- Login to your google cloud account
- Create a new project: https://console.developers.google.com/project
- Choose the new project
- In the project Dashboard center pane (Top-left), choose “APIs & Services”
- And then in the right pane, choose “OAuth consent screen” tab. Fill the table and save with your information.
-
In the left center pane, choose “Credentials” tab.
- Hit the blue font “CREATE CREADENTIALS” dropdown
- Choose “OAuth client ID”
- Choose “Web application”
- Application name is freeform, choose something appropriate
- Authorized JavaScript origins is your domain ex:
https://<vpn_webauth_host> - Authorized redirect URIs is the location of oauth2/callback ex:
https://<vpn_webauth_host>/auth/google/callback - Choose “Create”
- Take note of the Client ID and Client Secret which will be used to configure
vpn-webauth.
Configure vpn-webauth with oauth2
Download vpn-webauth release binary
wget https://github.com/m-barthelemy/vpn-webauth/releases/download/0.8.8/vpn-webauth-0.8.8-linux-amd64.tar.gz
tar -zxvf vpn-webauth-0.8.8-linux-amd64.tar.gz
# Or you can clone the repo and build it yourself: go get github.com/m-barthelemy/vpn-webauth
# The project also provide Dockerfile to build
Configure the application using ENV values
# This project only support azure and google oauth2 provider
export OAUTH2PROVIDER=google

# The oauth2 client id and secret is generated by creating google oauth consent screen
export OAUTH2CLIENTID="<oauth2_client_id_created_in_your_google_cloud>"
export OAUTH2CLIENTSECRET="<oauth2_client_secret_created_in_your_google_cloud>"

# Key used to encrypt sensitive information in the database. Must be 32 characters
export ENCRYPTIONKEY="569ea34a0c4c09f6b3f228006caee15f"

export ADMINEMAIL="<admin_mail>"

# If they are not set, a new key pair will be dynamically generated and suggested before the app startup fails.
export VAPIDPUBLICKEY="BD-JDW6OQc9XUGMVW4bc3yz82DTPABjK7j719Wg0b8n2bQvH4wrYtFIeKYLZB_haBKgalUsVaGR33xB38to-Q9M"
export VAPIDPRIVATEKEY="ZhP-xYQvGff1dvm7eyH24mNH2ezyPrSpjbaVUFlYV1Q"
# You can generate the key yourself
# openssl ecparam -name prime256v1 -genkey -noout -out vapid_private.pem
# Output private key in a format suitable for VAPIDPRIVATEKEY:
# openssl ec -in vapid_private.pem -outform DER|tail -c +8|head -c 32|base64|tr -d '=' |tr '/+' '_-'
# Output public key in a format suitable for VAPIDPUBLICKEY:
# openssl ec -in vapid_private.pem -pubout -outform DER|tail -c 65|base64|tr -d '=' |tr '/+' '_-'

# The base URL that OAuth2 will redirect to after signing in and You need to add this app redirect/callback endpoint (REDIRECTDOMAIN/auth/google/callback or REDIRECTDOMAIN/auth/azure/callback) to the list of allowed callbacks in your Google or Azure credentials configuration console
export REDIRECTDOMAIN="http://<vpn-webauth-service>"

# Configure the DB. Default: tmp/vpnwa.db
export DBDSN="host=127.0.0.1 user=vpnwa password='' database=vpnwa port=5432"

# VPNCHECKPASSWORD: Shared password between the app and the Strongswan ext-auth script to protect the endpoint checking for valid user "sessions", Default: ""

# Define the IP address and Port to listen on
export HOST=0.0.0.0
export PORT=8081

# Execute the binary, you may need to enable the listened port for the external to access the service
./vpn-webauth
Configure Strongswan server-side with vpn-webauth
# We use strongswan 5.8.2 release to build, you should pre-install the requirements
cd strongswan-5.8.2/
./configure --prefix=/usr --sysconfdir=/etc --enable-ext-auth
make -j 4 install
The strongswan is configured with --ext-auth enabled and you should configure this plugin to the vpn-webauth check script, edit the /etc/strongswan.d/charon/ext-auth.conf and replace the "" with your VPNCHECKPASSWORD which is defined in vpn-webauth, default is ""
ext-auth {

    # Whether to load the plugin. Can also be an integer to increase the
    # priority of this plugin.
    load = yes

    # Shell script to invoke for peer authorization.
    script = /<Path_to_vpn-webauth>/webauth-check.sh http://<this_app_host>/vpn/check ""
}
The script will gather and send the following JSON data to /vpn/check and then vpn-webauth will check if the specified information stored in the vpn session database, if the session information exists, vpn-webauth will response eg. “Ok 6.267331ms” and strongswan passes the AUTHENTICATION check and setup the IPSEC tunnel, or it will report a AUTHENTICATION_FAILED error and the IPSEC tunnel can not been established.
Demo
Pre-requirements
- Download an authenticator application on your phone
- Setup the
stongswanclient and server - Configure and listen configured port using
vpn-webauth
Steps
- The user registers to the
vpn_webauth(before connecting to the VPN) - Users authenticate using OAuth2
- Users are required to complete additional authentication, using an OTP token (independent from the OAuth2 provider 2FA), TouchID/FaceID or a physical security key.
- A “session” is created with the user email, their source IP address and the time when they completed the web authentication
- They now connect to the VPN. Strongswan’s
ext-authplugin calls this webapp to check if the user has successfully completed a web authentication recently and from the same source IP address. If not, the connection is rejected.
Topology
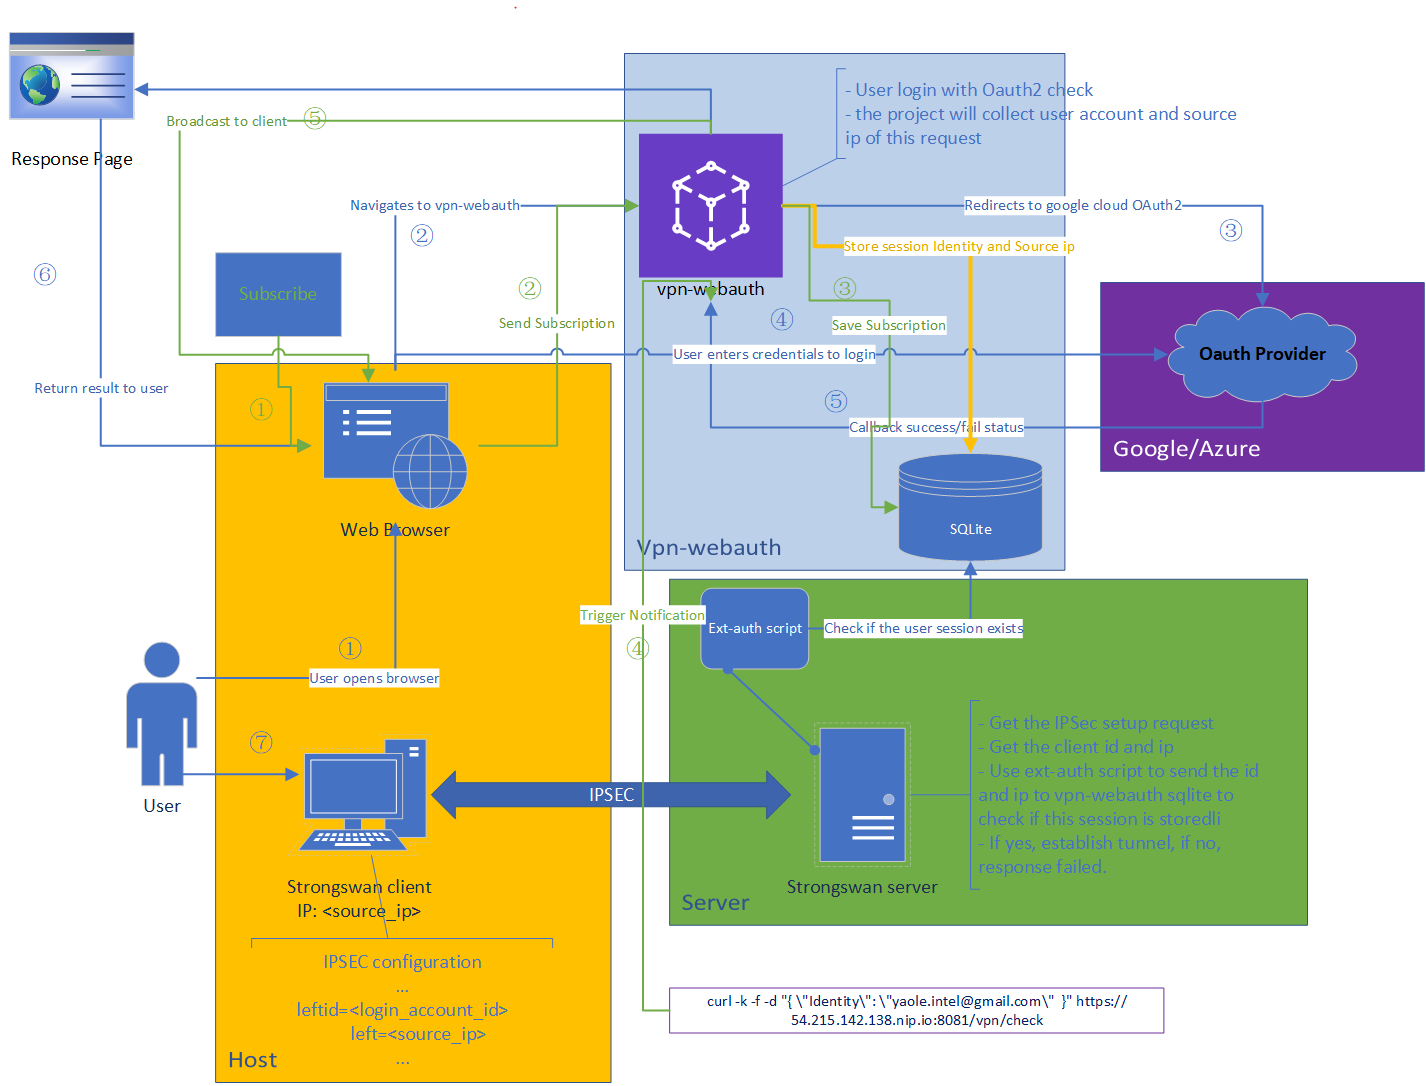
Notification
As the topology diagram shows, the green line explain the flow of the notification.
Configuration
Firstly, we should configure the server side vpn-webauth to a https server to enable notification because modern browser always ask a https connection to trust the sites.
# To enable notification, we should configure vpn-webauth as a https server
# Here, we create self-signed key and use the custom SSLMODE for vpn-webauth, you also can use auto mode.
export SSLCUSTOMKEYPATH="/ssl/key.pem"
export SSLCUSTOMCERTPATH="/ssl/cert.pem"
export SSLMODE=custom
# export SSLMODE=auto

# Configure the redirect url to https
export REDIRECTDOMAIN="https:://<vpn-webauth-service>"

# Enable the notifications
export ENABLENOTIFICATIONS=true

# Currently Google Chrome, Firefox and Edge support notifications and automated VPN session renewal without meeding to keep this app opened. Safari requires the user to keep a tab open.
Browser setup
To enable notification, we should allow the permission to the vpn-webauth site, when we firstly login to the vpn-webauth, it will ask for the notification permission, and we should allow it. Or you can manually setup the notification allowed in browser. (eg. Chrome -> Settings -> Privacy and security -> Site settings -> Permissions -> Notifications)
And when we login into the vpn-webauth, the session will be verified by two pre-configuration in vpn-webauth, the WEBSESSIONVALIDITY and VPNSESSIONVALIDITY, after registering or signing in, users will be shown a message inviting them to enable notifications for the app. If they accept, when they attempt to connect to the VPN without a valid web session, they will receive a notification letting them know that they need to sign in for the VPN connection to be authorized. Additionally, if their VPN session is expired (VPNSESSIONVALIDITY) but they still have a valid web session (WEBSESSIONVALIDITY), their next attempt to connect to the VPN will try to transparently ask the browser used to sign in to prove that it still holds a valid session and has the same source IP as the VPN connection attempt. If so, the VPN connection will be automatically allowed and a new VPN “session” created without any intervention. (The browser must be running even without this application opened).
Users can trigger the notification by send request to vpn-webauth when is VPN session is expired (We remove the source IP check here by modifying the source code).
curl -f -d "{ \"Identity\": \<account_id>\ }" https://<vpn-webauth>/vpn/check`